![[H89]](h89_sys_hs.jpg)
This Web page last updated date Dec 26 2016. copyright Herb Johnson (C) 2016. . In 2016 I repaired a number of H89's. See this linked Web page for an introduction to them. This H89 has a H17 hard-sectored floppy controller and a H37 soft-sectored controller. This Web page discusses my recent work in 2016 forward to restore it to operation. My thanks to Lee Hart, Bill Degnan, and Alex Bodnar. - Herb Johnson
This is a working H89 with model 2650 terminal board, 2549 CPU board, with a hard-sectored and a soft-sectored controller, a 3-port serial card, and a 40-track floppy drive. I worked on this in 2009, and again in 2011. In 2016 I'm using this systems mostly for support,
while I use a restored H89 for hardware development.
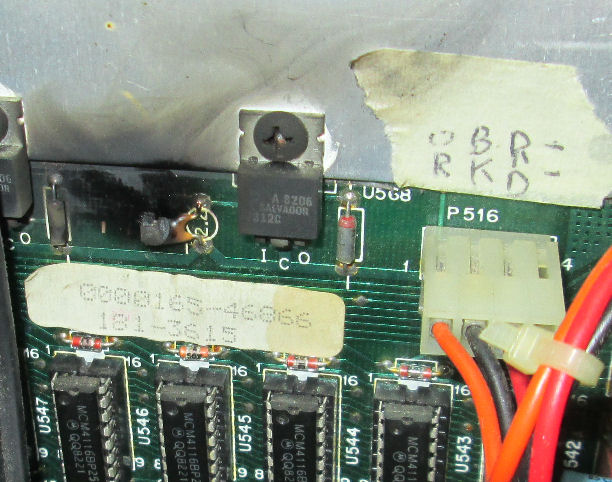
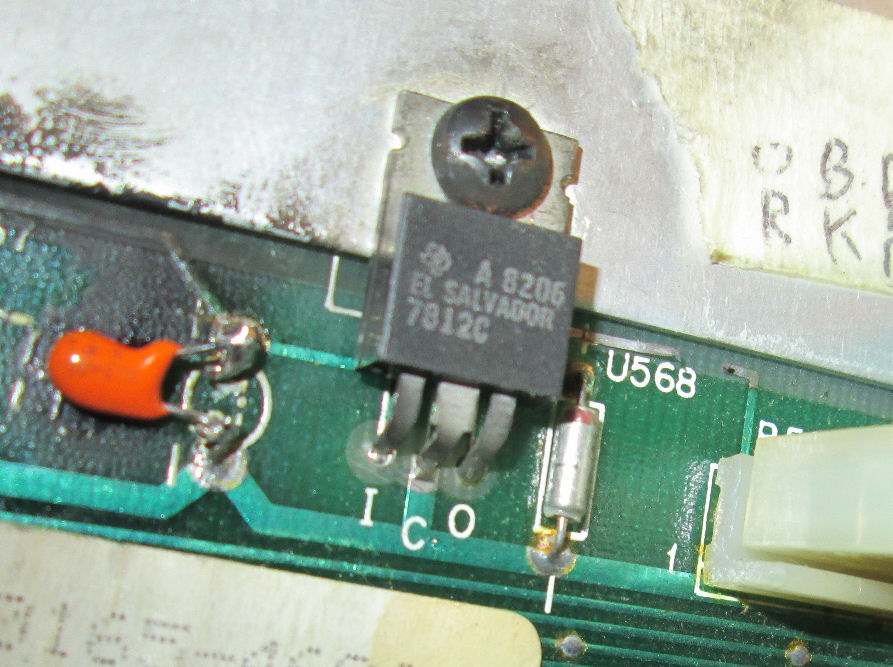
May 28th-30th 2016: While running this system to test another floppy drive, when I powered it up - CRACK! FLASH! - one of the tantalum caps ignited. Here you see the burnt capacitor and scorched board. After I replaced the capacitor (2.2uFd at 16V), there was no positive DC voltage on it. I traced it as the input (14-15V) to the nearby 7812 regulator. Inspection shows the open trace near the "U568" lettering, the trace goes to the Molex connector which supplies unregulated +14V. I added a wire to replace the trace - soldered to the Molex connector and so did the repair in the cabinet. But the unregulated voltage was actually about 19 volts. It blew up one cap I put in with a 16V rating; I put in a 1uFd 25V cap and that seemed to hold. - Herb
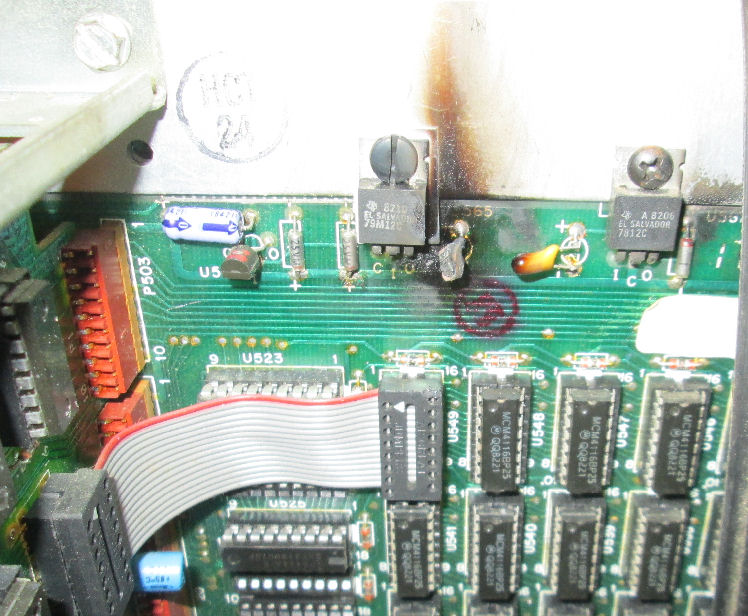
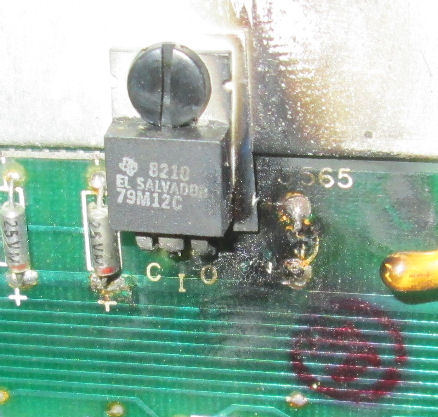
June 9th 2016: I'm repairing a disk/drive problem on my "restored" H89 system. I damaged my working disks on the restored system so I was trying to create new ones.I'm using this system to boot and test, using my two test floppy drives, of course booting from the hard sectored controller. I try to boot the 2.204 copied disk I just made. It won't boot that. With either drive I previously used on systems #1 and #2, it won't boot. I'm about to pull another floppy drive when !!FLASH!! FOOOMMMMM!!!! This system #2 cooks a tantalum capacitor. It's on the CPU board, flames up right in front of me. I rush to switch off the AC.
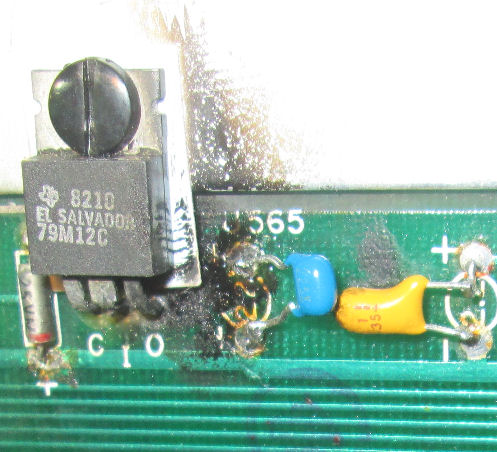
I"ve had enough of fried tantalums. I've ordered ceramic 2.2uF 50V capacitors. They arrived a few days later. I cut off
and cleaned the burned-out cap. I left stubs of the component so I could solder in-place. Then I
installed the blue ceramic cap. Compare it to the polarized yellow tantalum on the left, 2.2uF 35V. Then I powered up
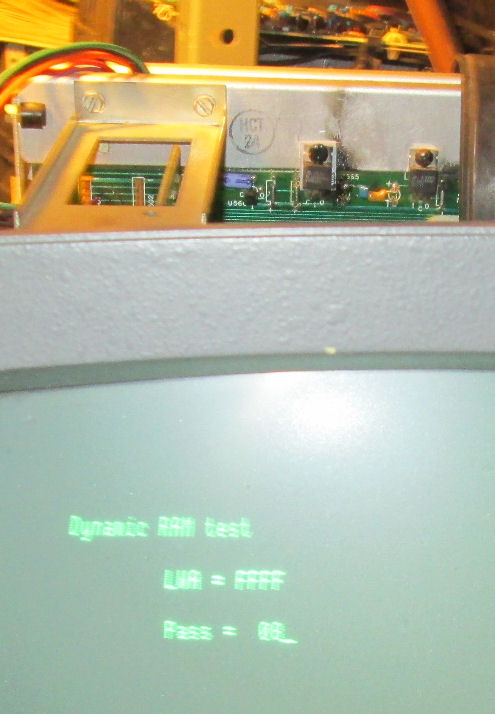
with a Variac to monitor the DC regulation; -18V in, -12V out. Everything came up OK, and the H89 passed internal RAM test.
![[H89]](h89_softhard_fdc.jpg)
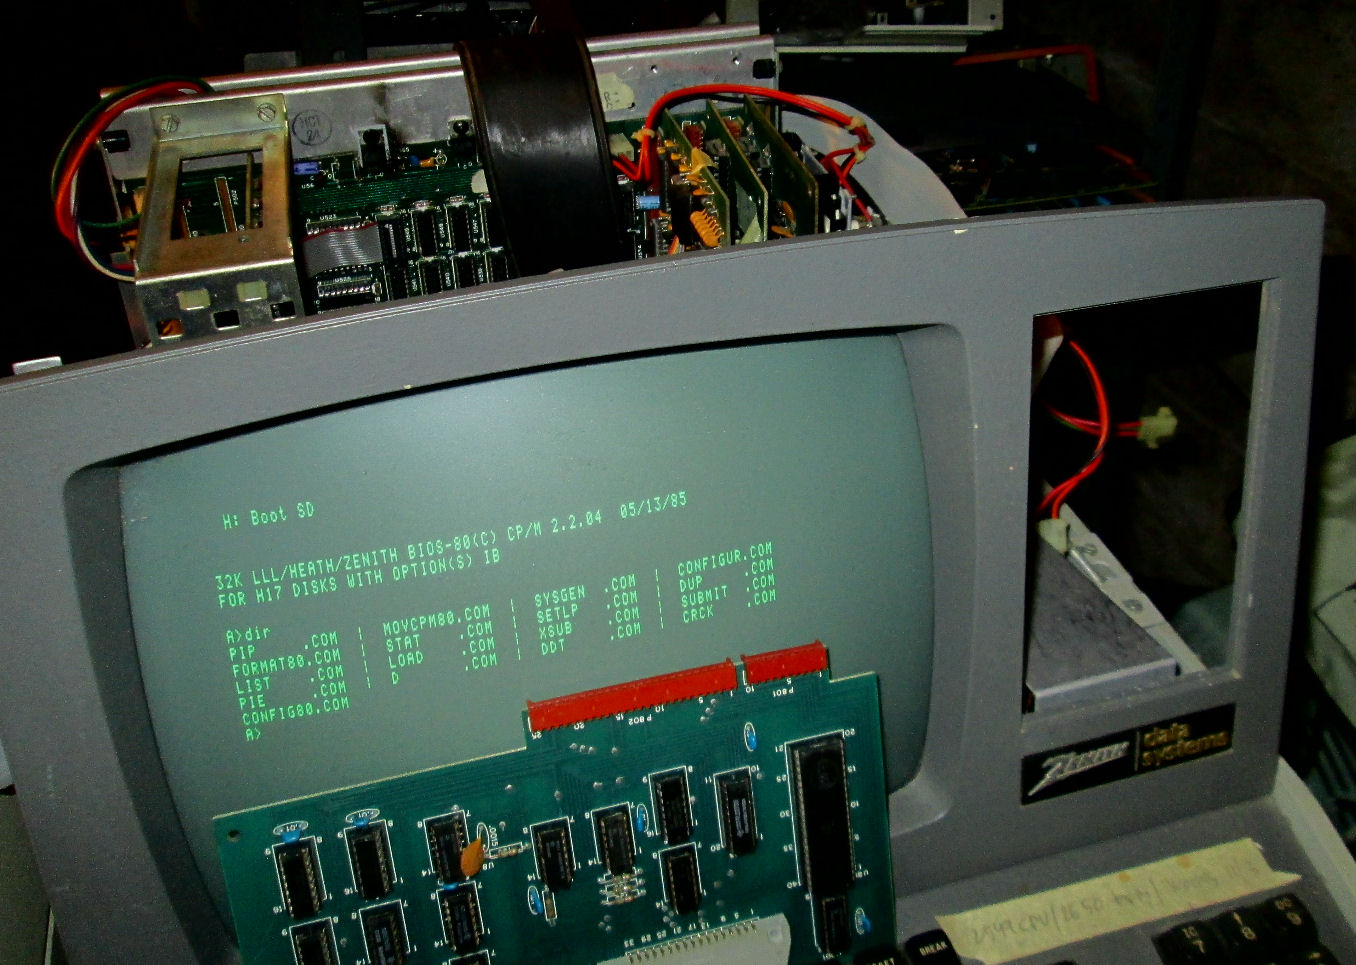
In mid-Nov 2016, I worked on this system again, to test and create soft-sectored disks. This H89 has a H37 soft-sectored controller card, which worked years ago. My H89 development work this year has been on hard-sectored diskettes, as I had many of them including system disks.
I don't have many soft-sectored CP/M disks, no HDOS disks. And one set of CP/M distribution disks I had, had a damaged boot disk. So I called upon a few friends of mine, and they kindly sent me some bootable CP/M and HDOS soft-sectored disks they copied. Bill Degnan made copies of H8D disk images from SEBHC's Web site, using Dunfield's IMAGEDSK program. Alex Bodnar made CP/M and an HDOS disk from his H89 collection.
HOwever, this system could not boot from them. It booted OK from HDOS and CP/M hard-sectored diskettes via the H17 controller; so I knew most of the H89 was operating correctly.
![[H89]](h89_hs_softflop.jpg)
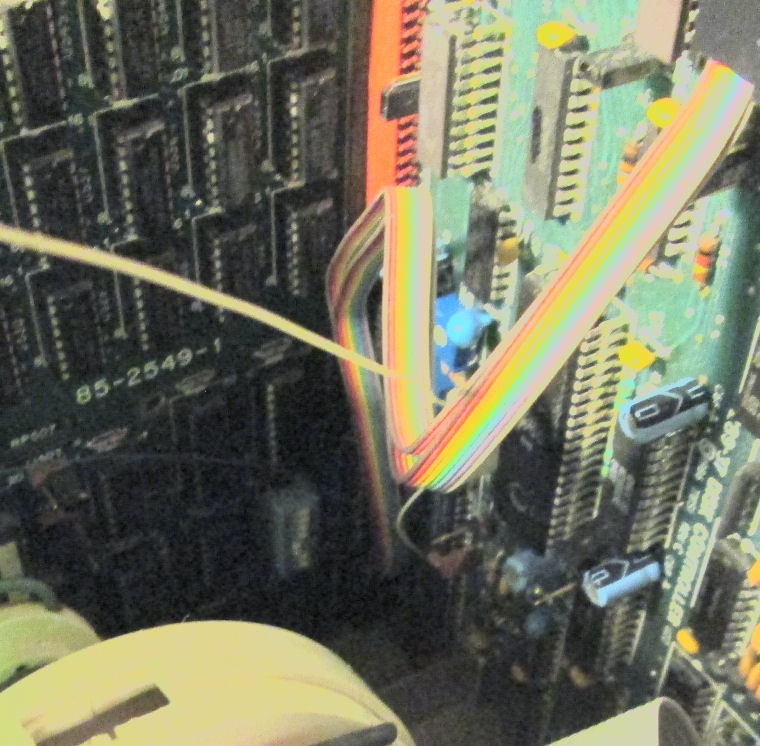
Hammering heads: So here's the behaviors of the drive and H37 controller. Using drives which worked on the H17 on two H89's, I tried to use them with the H37. I even tested the drive cable on the H17, to confirm it was properly connecting drive to controller.
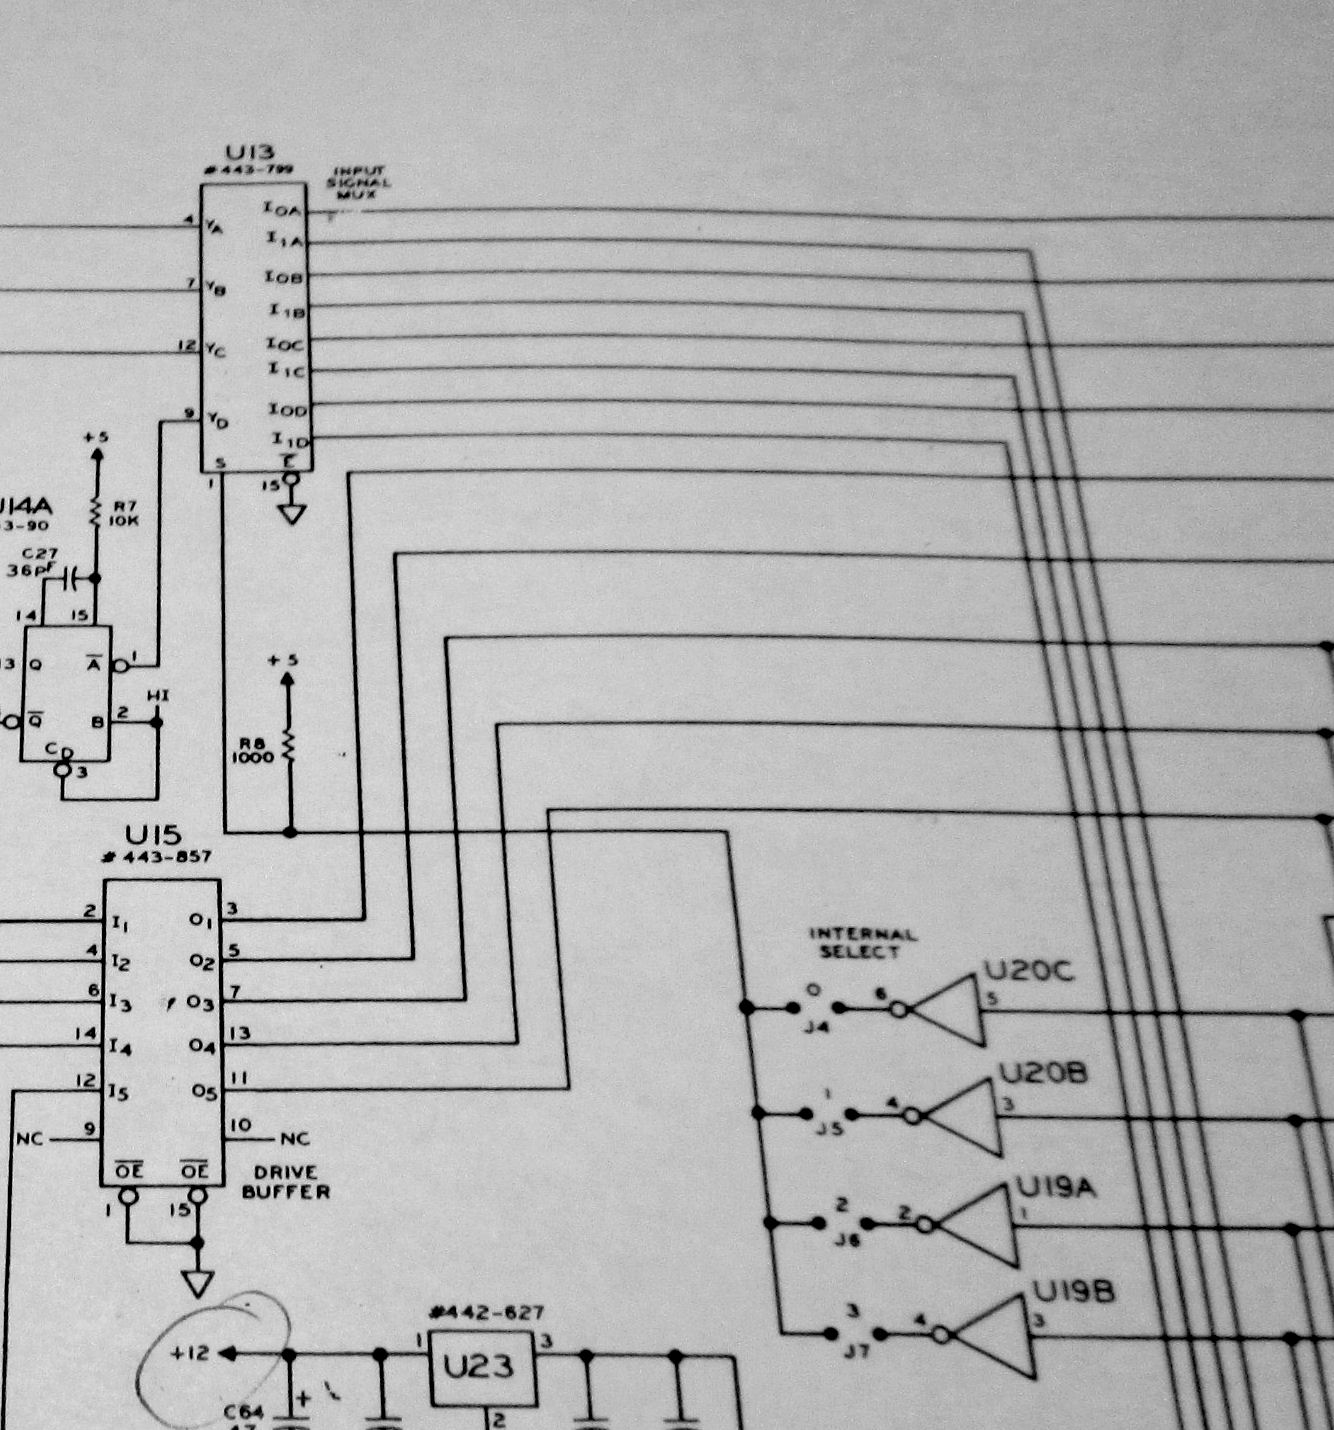
My first problem was getting the drive heads to seek properly: the symptom was the drive would be selected (by ROM monitor boot command) but the heads would "hammer" at track 00, keep seeing backwards. Lee Hart suggested looking at the U13 multiplexer chip. That led me to look at the jumpering on the board which selects drives, connected to the INTERNAL drive 40-pin connector. That connector was set to enable one drive address - not the address I was using. So changing the cable to the EXTERNAL drive connector, routed the "track 00" signal (and other incoming signals) to the floppy controller chip and fixed that problem.
![[H89]](h89_hs_signals.jpg)
no data: Now that the drives properly seek to track 00 and wait, I could test the bootable CP/M disks I recently obtained. On monitor boot, the drive would be selected, the heads would seek; but no further response after reaching track 00, and the ROM monitor would return to the H: prompt. So a reasonable strategy, was to confirm that the read signal was being selected and reaching the floppy controller. My oscilloscope, showed the index signal and read signal were getting onto the H37 board. It's hard to trace signals deep inside the H89. I resorted to soldering wire-wrap wires to ground and selected pins on the H37, a tedious process.
Strategy: Lee Hart and I discussed this and other diagnostics. He suggested confirming +12v which goes both to the floppy-controller IC and to a regulator which produces 5V to the data decoder. 12V and 5 V were there. He suggested running the "H37 diagnostic disk" software, a hard-sectored disk with comes with the H37. I reluctantly made a copy of my original disk; the copying did not damage the original, but the copied program produced no diagnostic information.
Lee Hart and I discussed my options. He said "My suspicions at this point would be the 1797 disk controller, or maybe the PALs on the board. I've never had a bad controller, but often had PALs fail. They run hot; maybe that has something to do with it. I wish I had spares. I still have blank H37 boards, but can't make them because I ran out of PALs."
I said: "Here's my next plans:
1 - I have another H37 controller, but it is "dead" - and kills the ROM monitor prompt. I may try to fix it, to see if it works any better when running.
2 - I have another H89 I acquired last month, which has a soft-sectored controller. I really didn't want to bring that unit up, cold after decades of storage. I'd rather not pull the H37 card, either.
3- And I have a NEVER used H37 in original box with docs and disks. I'd rather not touch that. (sigh)
Lee said: "Given that, I'd [take the 2nd choice, and] pull the H37 out of the unit that you acquired last month. Try it. Once you get it working, you can swap socketed ICs from the "good" unit to the "bad" ones to see if it's a bad chip."
![[H89]](h89_hs_hdos.jpg)
Nov 23th: I pulled a H37 from an untested machine, recently acquired. It was modified, rewired, to share an internal drive with the hard-sectored H17 controller. But I plugged it into the H89 I'm working on....and it worked! I was able to boot a recently produced soft-sectored HDOS and CP/M disks. I formatted a CP/M disk and was sysgening and copying files. Then I tried to boot the result....and could not. Why? On H89 reset, I happened to do a memory test and it only found memory to 5FFFH. My guess later, is that I damaged it while running the three I/O boards (disk controllers and serial board) "loose", which occasionally forced CPU resets, and probably damaged the memory.
![[H89]](h89_hs_5FFF.jpg)
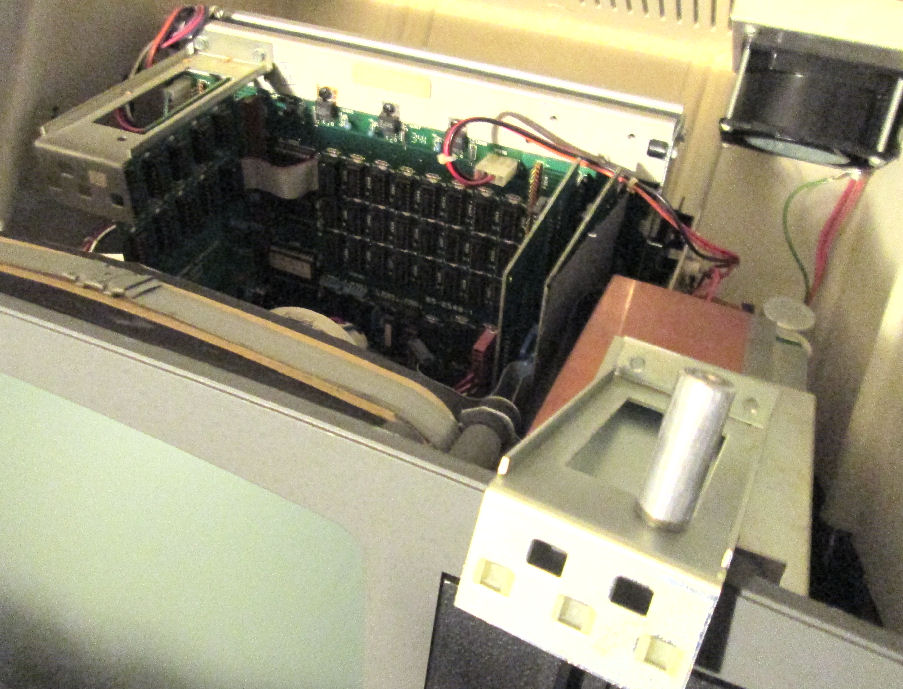
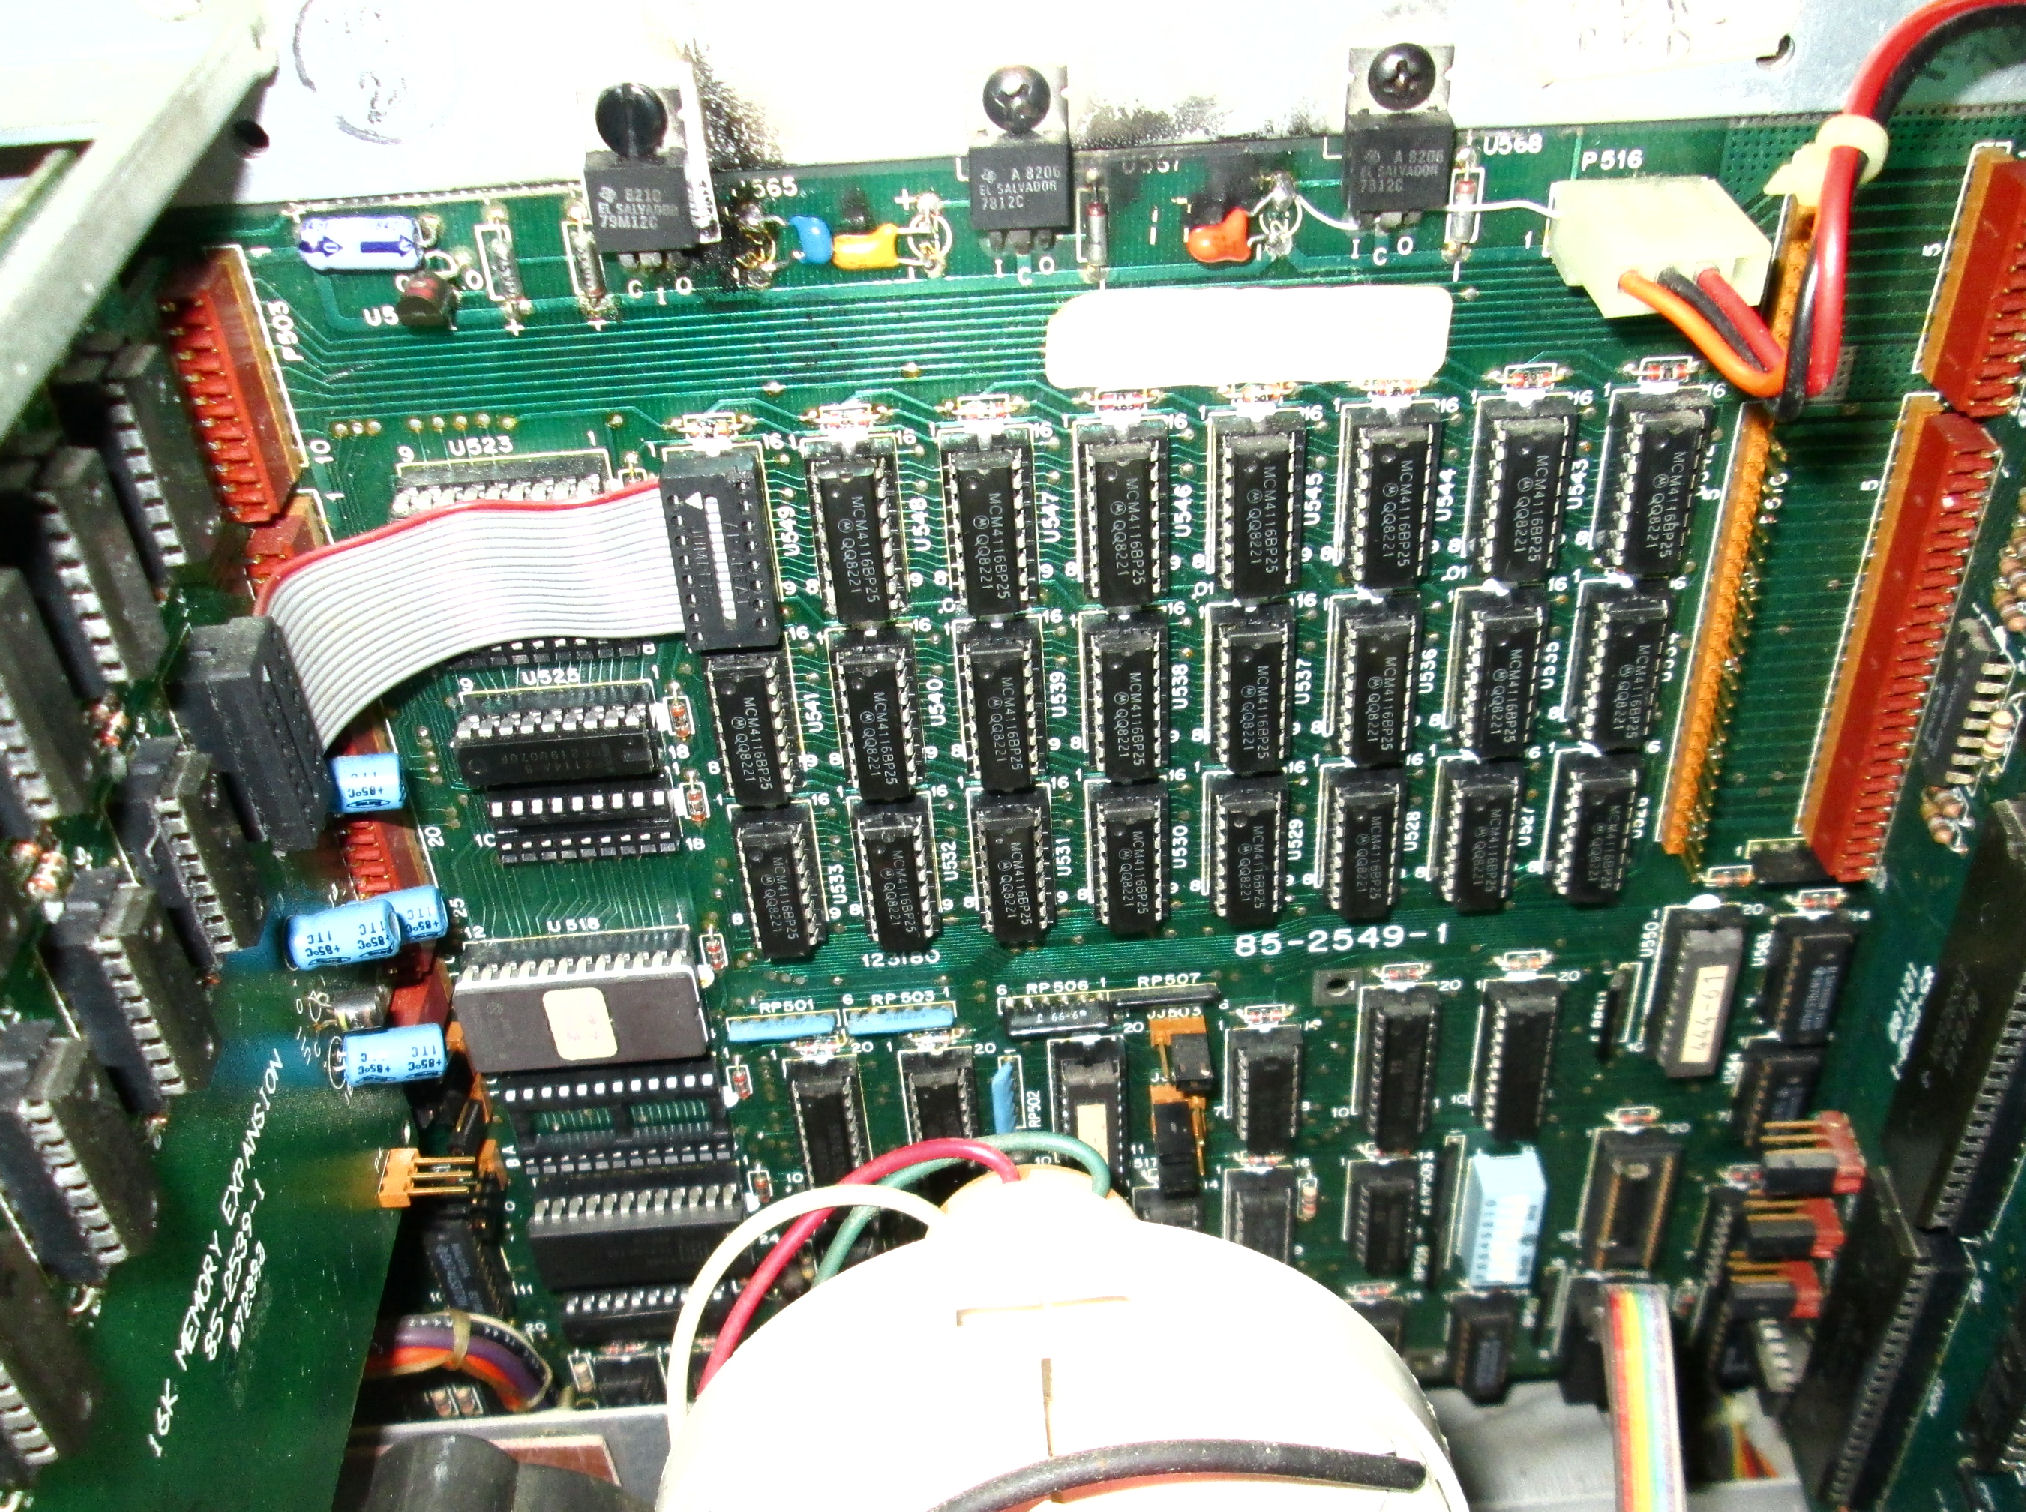
Nov 23rd: My H89 developed a memory fault. ROM mnitor testing shows that when I enter a 00H from 6000H to 9FFFH, I get back 20H. So I'll read the schematics to see which RAM chip I need to replace....Actually the H98 CPU manual, describes the memory layout. The CPU board as photographed here shows three rows of RAM. The lowest row is low memory; the leftmost chips are the upper bits. So the bit for 20H in 6000H and up, would be the middle row and the 6th bit from the right, U539.
I fumbled around with replacing that chip, another 4116 DRAM, without removing the CPU board. The second 4116 I tried worked successfully, passing the ROM memory test. Also it passed the "Dr. T" memory diagnostic. And... it booted up CP/M from the copied disk I made. I didn't have a checksum program, but I ran each program on the copied disk and they seemed to behave.
So, I proceeded to have a Happy Thanksgiving the next day. Debugging my almost-working card will wait. My thanks to Lee Hart for his advice; and Bill Degnan and Alex Bodnar, who provided the soft-sectored diskette copies. - Herb Johnson
![[H89]](h89_sys_cpm04.jpg)
After the Thanksgiving holiday, I continued to use the working-pulled H37 controller. I was able to read, format and execute from both HDOS and CP/M soft-sectored diskettes. I chose to use one soft-sectored drive, simply because I had a simple floppy case and I wanted convenient access to the case to swap and test more floppy drives. But thanks to the CP/M BIOS, copying on one drive was merely tedious. The BIOS told me when to swap beteeen the A:> and B:> disks on the single drive, and my copies were successful.
I also ran a hard-sectored diskette with Heath's soft-sectored diagnostics; I happened to have a Heath original of this disk. With the working H37 controller, it ran various tests such as drive rotation speed (as percentage of 300RPM, I got 97.3% and 98.2%); seek tests (speed of head-step); and media verification. I didn't run the format test, I used CP/M to create formatted disks. Either single-density or double-density seemed to be testable.
Dec 4th: PAL tests With some confidence in a working H37 controller, I checked the two PALs (programmed logic) chips on the board. U4 444-82 and U6 444-81 are 10H8 model chips, primarily from MMI. I used my BP Systems PAL reader/writer, on an MS-DOS PC to read the PALs. With three H37 boards (only one working), I read each pair of PALs and saved results as a HEX file of bits, and a JEDEC file. Thes are both text files. The programmer is able to compare a PAL to a saved file; with this test I compared the three sets of two PALs. All three PAL sets "matched". So I conclude the problem with the non-working boards is not in the PALs.
Here's the two pairs of files (HEX, JEDEC) for the two 10H8 PALs on the H37 soft-sectored card.
![[H89]](h89_hs_softrun_7474.jpg)
late Dec, IC tests: Lee Hart suggested I simply swap IC's from the nonworking H37, into the working H37, and identify a bad chip that way. I didn't have to swap the PALs as they were verified. And I decided to work on the "dead" H37 controller - the one which when installed, causes the H89 ROM monitor to fail. Also, all its IC's were socketed, as are the IC's on the working H37. I also considered the failure was likely in the data and I/O addressing portions of the H37, so I started with those chips first. Also, I limited my testing to simply restoring the ROM monitor to operation - that saved the fuss of connecting the cable to the external floppy drive. And initially, my strategy was to test the NONworking H37 while individually replacing chips of interest, to see if I could get the ROM monitor to run - a simple GO/NOGO test.
The point of my "tedious" explanation above, is to demonstrate how to create the simplest testing effort to produce the desired diagnostic result. Just swapping chips and "trying to boot" would have taken far longer. Also: I chose to test at first on my NON-working controller, thus minimizing my handling of my only, working, controller.
So my initial tests were to change individual chips on my non-working controller. First I swapped the IC's which support the data lines, and which "feed" the PAL logic. Those were common enough chips - 74LS240, 74LS373. The simple open-collector AND chip, 74LS03, was surprisingly UNcommon in my collection of TTL chips. I tried a 7403. Changing each of these on the nonworking controller, produced no change in ROM operation when the nonworking H37 was reinstalled. The remaining chips were not available in my TTL stock, so my only "swap" resource was my working controller.
Additionally: it's difficult to swap boards in and out of the H89. My serial board kept banging into the H37 board, or falling out of its mount, and causing boot problems. (It's likely this caused a RAM failure earlier.) Installing the bracket to hold the boards would be tedious. So I inserted paper between the H37 controller and the serial controller. This worked for the duration of my testing.
When I ran out of spare IC's, I decided to change strategy, and pulled individual chips from the non-working card, to install and test on the working card - to find the failure. The 74LS148 from the non-working board, was swapped into the working H37. I also noticed this TI-brand chip had a lot of "black pin" color. I used a soft-rubber eraser to clean the pins before test. This chip allowed ROM operation and was either "fixed" by my cleaning or was not the problem. But when I swapped the 74LS74 (dual flip-flop), into the working H37, I got a ROM monitor prompt and response!
repaired H37: So, I installed the floppy cable and tried to boot and test the H37. While the drive was "accessed", it didn't step the head or boot. I pulled and reviewed the H37 controller (formerly nonworking). I set the "drive select" jumpers on the H37 from DS2 to DS0, and used the external, lower floppy connector. That worked! and I booted CP/M.
![[H89]](h89_hs_softrun_test.jpg)
I followed that result, with runs of the H/Z hard-sectored testing disk for the soft-sectored controller.
These tests bring up a two-part menu, which either performes basic seek and access drive tests, or tests to format and check sectors and timing. The
tests run very slowly, don't provide much information under operation. It's hard to tell if the tests have "stalled", or just crashed. And as I noted
earlier in this section, the loosely-mounted serial board and H37 board were problems. But with care, I got a successful-enough "run" of some of the
tests. And, I could boot the CP/M diskette, and read a formatted soft-sectored CP/M disk I created previously with my working controller. So I believe
the "dead" controller is now operational, and I'll properly reassemble this H89 system for further testing and use. - Herb Johnson
- Herb